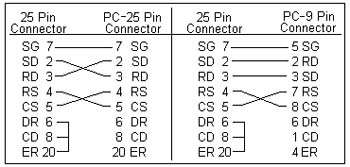
Fanuc RS232 cable drawing and RS 232 Coms port settings Fanuc RS232 Communications Information
Signal Description
Signal Name Pin # I/O Description
SD 2 O Sending Data
RD 3 I Recieving Data
RTS 4 O Request To Send:
This Signal is set to on when the NC starts sending data and is turned off when the transmission ends.
CTS 5 I Clear To Send:
When this signal and the DSR signal are set high, the NC can send data from SD. If this signal is set low the NC will stop sending data after two more characters are sent. Jump 5 to 4 if signal isn't used.
DSR 6 I Data Set Ready:
When the external device is ready to operate to needs to set this signal high. If this signal goes low anytime during data transfer, NC alarm 86 will occur. Jump 6 to 20 if signal isn't used.
SG 7 - Signal Ground
CD 8 I Carrier Detect:
Signal must be straped to DTR. Jump 8 to 20 in cable.
DTR 20 O Data Terminal Ready:
This Signal is set to on when the NC is ready for operation.
FG 1 - Frame Ground:
This electrically connects the NC cabinet ground to your extirnal device's ground.
Note: If grounds are of a different potential between devices, damage to equipment and/or electric shock can occure. Be sure all equipment is properly grounded!
FANUC 6 RS232 SETTINGS
1. With the power on, turn the door interlock key, on the back of the control, to OFF.
• This will allow you to open the door without shuting off the control or shunt breaker.
2. Open the front door on the control and turn the Parameter switch to Enable.
• The switch is located on the Master PC Board in the lower left corner.
• Alarm 000 will be displayed on the CRT screen.
• This is just to let you know that the parameters are unprotected and can be over written.
3. Select MDI on the mode switch and turn the Edit Protect key OFF.
• You must be in MDI mode to change any parameters.
4. Press the PARAM button on the Control.
• This will bring up the parameter page.
5. Insert the tape in the tape reader.
6. Press P-9999 then the READ button.
7. After you have finished loading parameters, return the parameter switch to Disable.
• You will need to turn power OFF and back ON to clear the alarm.
8. Test the machine to make sure the new settings are effective and accurate. You may need to edit the parameters if you are using the standard tape.

Email: star_circuit@hotmail.com
Tel: 0618829051
LINE ID: @450yvnqj